Build xcode project
在沒有設定 build 的步驟前, 其實 job 都沒有真正的 build 到 code, 他只是將你的 configuration build 成功而已
而要 build code 的前提下, 我們要提供 builder 給 Jenkins 使用, 今天我們所用的是 Objective-C 的語言, 所以我們要讓 Jenkins 可以去 build 他, 就必須讓他可以使用 xcode, 所以這裡將會講到該如何設定 xcode 給 Jenkins 使用
想當然爾, 電腦要先裝好 xcode 拉!
有兩種方式可以 build xcode project, 一個是直接安裝 xcode integration 的 plug-in, 另一個是直接 key shell script
不過第一個方式我目前還沒使用成功, 所以可以先跳過!!!
1. 使用 xcode integration
[ref https://wiki.jenkins-ci.org/display/JENKINS/Xcode+Plugin]
安裝套件的方式跟裝 git plugin 一樣
安裝好以後, 我們到 Configure System 找到 xcode Builder 的設定區域

如上設定好執行檔的位置後, 就 Save 離開這一頁吧
接著進到 job 的 configure 頁面, 會看到我們第一次新增 Job 的畫面
到 Build 的區域並選擇 xcode

你的頁面就會多出了 Xcode 的區域

設定 Target, 基本上就是 xcode 的專案名稱 -> Save
其實這樣就都設定好了, 接著 build 看看
結果發生一件事情, console output 顯示

xcrun 這個東西需要權限, 所以必須再將他權限開啟才能給 jenkins 使用
發現 xcrun 的權限是 -rwxr-xr-x, 應該要可以執行才對, 不管先讓他 chmod 777 再說
結果就跳出了
!FILENAME Operation not permitted chmod: Unable to change file mode on xcrun
>
所以目前還無解!!!
2. 使用 shell build
因為要設權限這件事情, 讓我卡關了一陣子, 所以我用了這個方法
直接 key shell script 來 run xcodebuild
這個方法有個好處, 不需要再裝 xcode integration 的套件
然後你的 command line 也就隨你的需求去下其他更多的指令, 或許對某些喜歡下指令的人來說方便了許多
我們直接就到 job 的 configure 頁面, Build 的區域點選 Execute shell
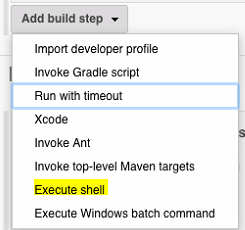
接著會出現 Execute shell 的區域

然後 key 上這串指令
sudo xcodebuild -configuration Release -target projectName
感覺比使用 xcode integtaion 快多了
當然有更多的指令, 也能直接透過 shell script 去下指令就好
這裡我們直接就使用 sudo 來執行 xcodebuild 就不會有權限的問題了
sudo 也是要打密碼, 這裡記得要先將 Jenkins 這個 User 設定為 sudo 不用 key password, 不然也是會有問題
sudo visudo加一行
jenkins ALL= NOPASSWD: ALL